Intro To Developing Effective Security Orchestration And Automation Processes
Security Orchestration, Automation, and Response (SOAR) has been a prominent buzzword in the information security community for a while. But what does it actually mean? I think it can mean different things for different organizations. As teams consume more data, the ability to process it becomes more difficult. Time, personnel, and skill restraints can affect the ability to respond timely to incidents, and routine tasks can suck away the more important time that your teams need. Automating portions of your incident response process can save valuable time and decrease your dwell time. I want to share how we are approaching SOAR and why, and then dive into the “how”.
Playbooks
The first step for most organizations will be to develop some playbooks for incident response. Playbooks are essential in determining the “what” and they give your team a clear process to follow for incident response. These playbooks don’t have to be fancy or complicated to be effective. In our case, we decided to start with three core playbooks that we felt would help with some common scenarios:
-
Malicious Email Incident (malware, phishing, etc.)
-
Endpoint Infection Incident (malware infection, ransomware, etc.)
-
Account Takeover/Compromise Incident (email compromise, etc.)
We determined that these three events comprised a good portion of what we were responding to as a team. We developed some simple playbooks to lay out the basic workflow for how our team should respond to these types of incidents. Once we developed these core playbooks, we mapped them to the incident response process and also assigned them a category and SLA that was sufficient in identifying them.
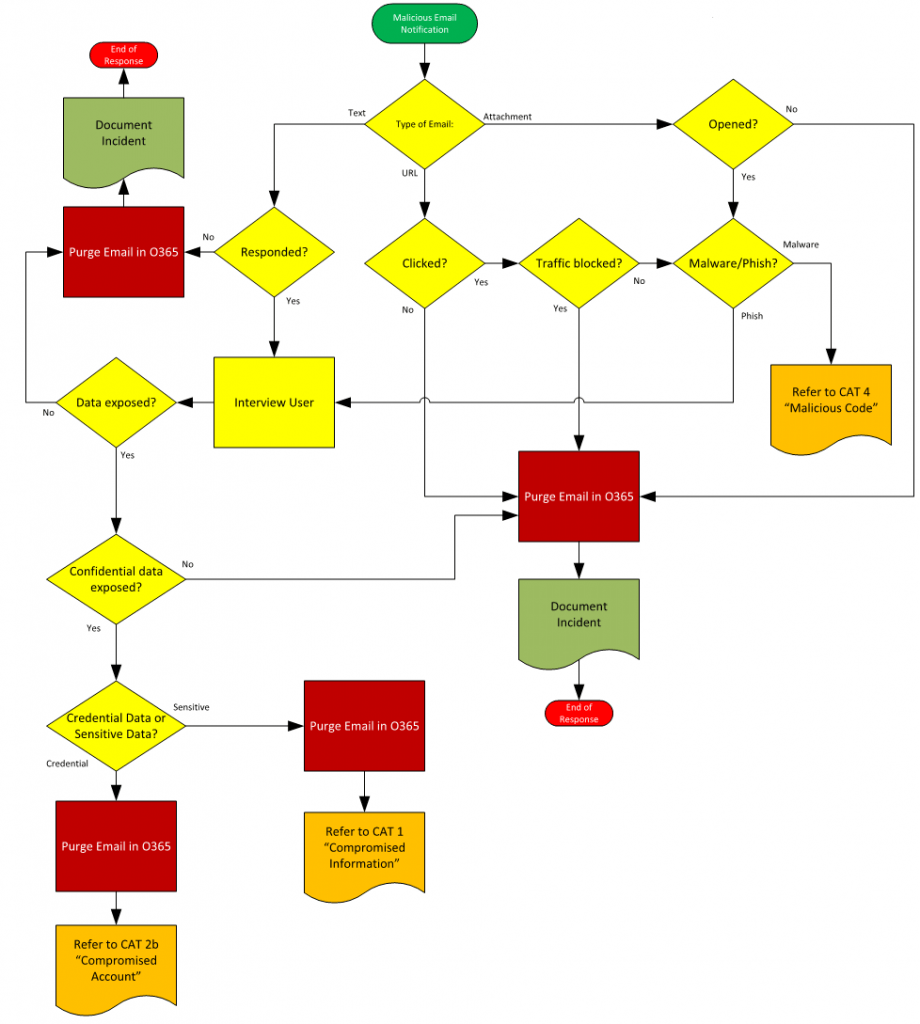
The example above is what we classified as a CAT-7 incident (Malicious Email). I will continue this article with this playbook in mind as the primary example of SOAR.
Workflow Assessment
An important part of this process is determining how often these incidents occur and how much time they are requiring of your team. If we look at the above example, the scenario might go something like this:
-
User reports a strange email or we receive a post-delivery notification that a malicious email was delivered or a URL clicked (Trigger)
-
Support team assigns this incident to the security team, or security team receives a direct alert of the email (2 minutes + dwell time)
-
IR team investigates the email (2 to 10 minutes)
-
IR team interviews user (5 minutes + dwell time)
-
Content search and Purge job (Powershell) to remove all instances of the email (10 to 20 minutes)
-
Reset the user’s password if they happened to reveal their account information via phishing link (5 minutes)
-
Block the offending malicious sender in email security gateway (5 minutes)
-
Add IoC to SIEM or other detection tools (5 minutes)
-
Document the incident (5 to 10 minutes)
So when we look at this workflow from a time perspective, we can expect this process to take around 30 to 40 minutes to complete if done manually from start to finish. Sometimes it will be much less, and other times more, but this is an average. These numbers don’t account for the dwell time between incident occurrence and detection, like whether anyone happened to see the alert, or the time it may have taken the support team to see the ticket.
Next, measure over a period of time how often these types of incidents are occurring. In our case, the average was around 1 to 2 per day, taking into account some days may have none, while other days may have 4 or 5. At this point, you can do the calculation to determine that you could save up to 1 to 2 hours per day by automating this workflow. This is significant because it not only frees up time, but removes the detection dwell time and increases security posture.
Automation and Orchestration
So how can we go about automating this workflow? You will need a few things in place in order to fully use automation and orchestration techniques.
One important thing is to make sure the products you use are API driven. This is becoming more of the norm these days, but without open APIs, automation can only be so effective. The other thing that you need is a SOAR tool or product. There are a number of great products on the market now, and while it’s not entirely impossible to build one yourself, having a well-established SOAR product will make integration a breeze. Lastly, you will need some resources with the skills required to actually build the automation workflows. Having skills in scripting/programming, JSON, Python, Powershell, REST, and other languages and frameworks will allow you to take full ownership of the automation development process. If not, you may have to lean on a 3rd party integration partner. As Secure DevOps continues to evolve, more and more information security staff will have coding knowledge that can be utilized for things like SOAR.
In our case, the SOAR product we chose was Rapid7’s InsightConnect, since its close integration with our SIEM was a key advantage. Some other SOAR products that I recommend are: Cybersponse, Demisto, and Swimlane.
Building the Automation
Like most other programming logic, automation is typically a set of triggers, decisions, and actions. In taking the example of our CAT-7 Malicious Email incident, it was clear after examining our playbook that we had some things that we could automate. It helps to whiteboard this out, or Visio a diagram of concrete actions involving what should happen.
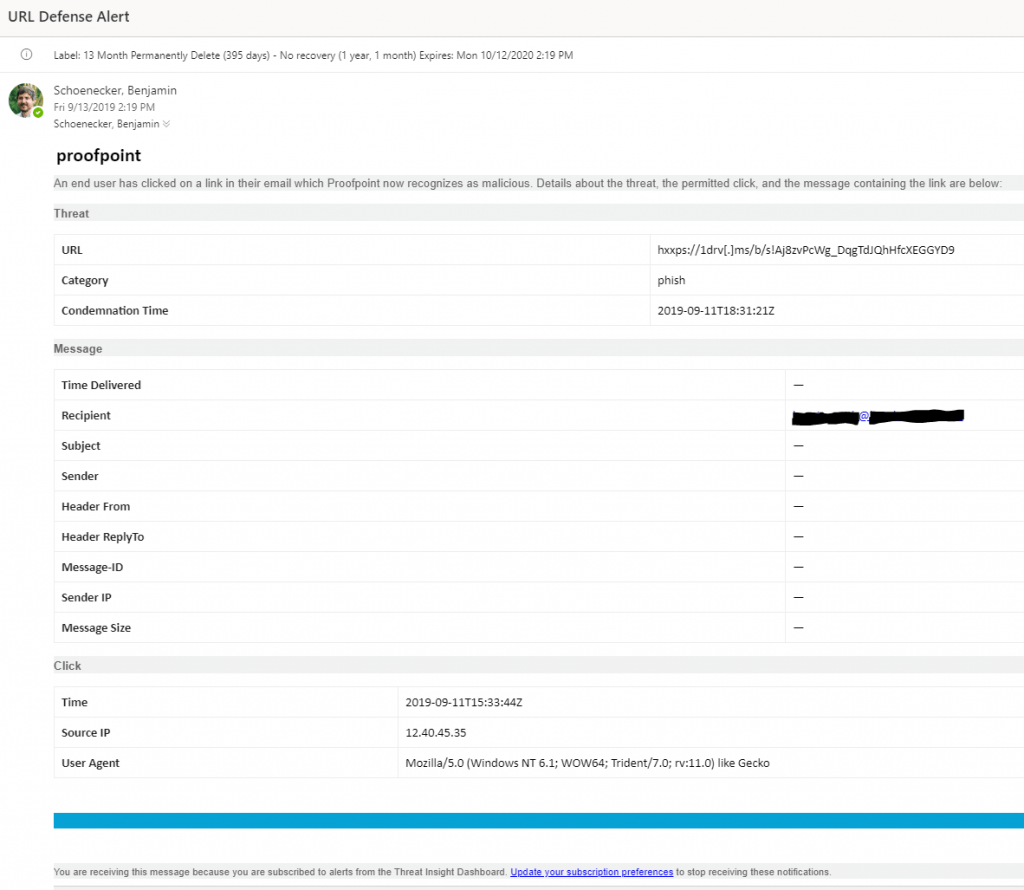
The first thing we had to decide on, was what would trigger the automation workflow. In our case, we decided that the Proofpoint TAP Email alerts would make a good trigger, so we started with these, with the intention of expanding trigger types in the future. The TAP (Targeted Attack Protection) alerts take advantage of Proofpoint’s URL Rewrite feature to find cases where malicious or phish emails are detected post-delivery. There are two types of alerts we receive:
-
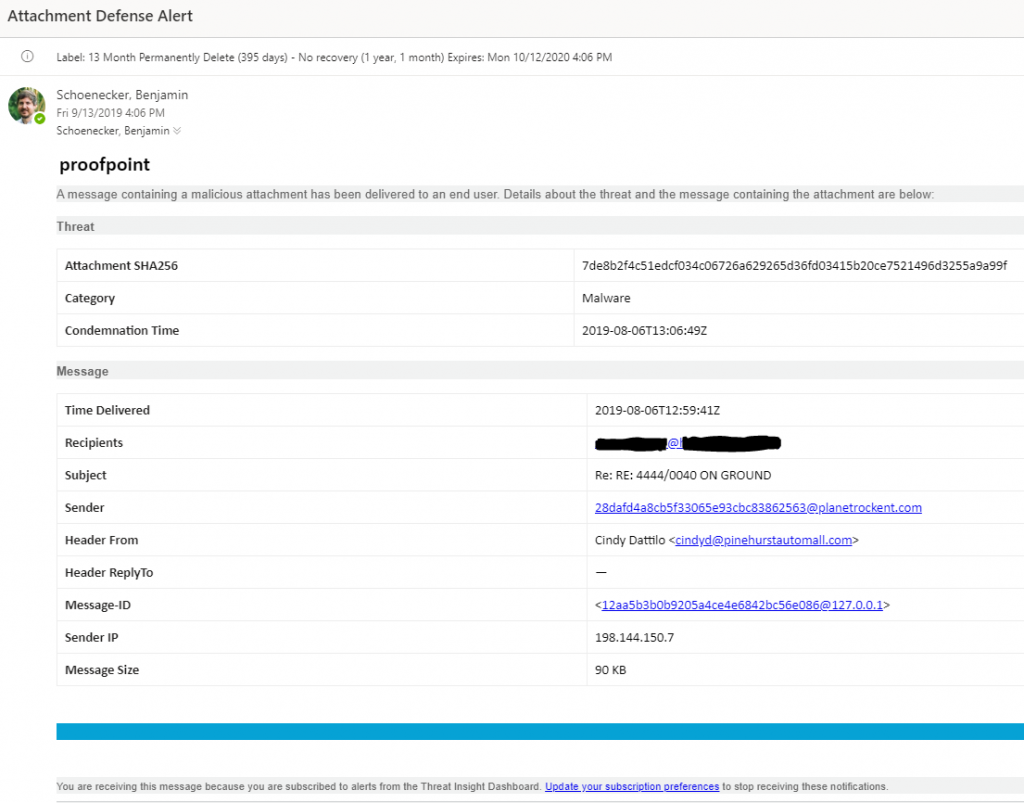
URL Defense Alert — A user clicks on a malicious or phishing link within an email in their inbox.
-
Attachment Defense Alert — A message containing malware has been delivered to a user.
Below are examples of the alerts that we receive.
The first thing we had to do within InsightConnect is setup a trigger to monitor a dedicated email inbox for these alerts. We used the provided Microsoft Office 365 Email API plugin within InsightConnect and set this up to monitor the inbox every 30 seconds for emails containing either the subject of “URL Defense Alert”, or “Attachment Defense Alert”. This was achieved through a simple Regex parse of the subject line. Any alerts arriving to the monitored inbox will then trigger the automation workflow, and output the email meta data as a JSON object to next steps within the automation chain.

With the previous step in place, we now had a trigger working that output the email content into a JSON object. Now we have to parse this data so we can properly use the information it contains. To do this, we used another Rapid7 provided plugin specifically designed for Proofpoint TAP alerts. We set up this plugin as an action that accepts the output of the previous trigger as input, then parses the relevant fields within the email body, and outputs them to a properly formatted JSON object that we can use in subsequent actions.
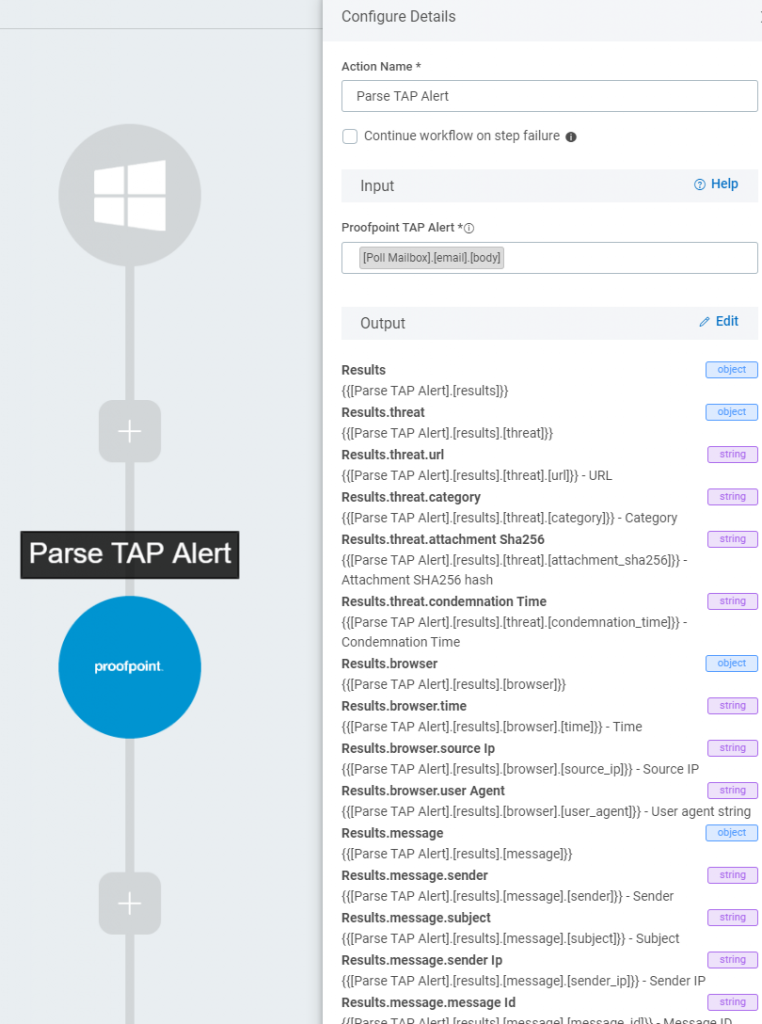
As you can see in the screenshot, the output of this step contains a number of JSON objects, and within the objects we have a lot of information about the TAP alert itself, mostly in string format. But these are all properties that we can use at any point further in the workflow by referencing their locator tag.
What we noticed immediately (see alert email screenshots), is that these two alerts are very different from each other. The Attachment Defense alerts contained much more workable information than the URL Defense alerts. This posed a challenge in that we had to treat them differently within the workflow. So, to that end, the next step was to add an automated decision to determine which alert type we were working with. This was done with an Automated Decision. This decision uses one “default path”, and will take that path as long as the other path expression is not true.
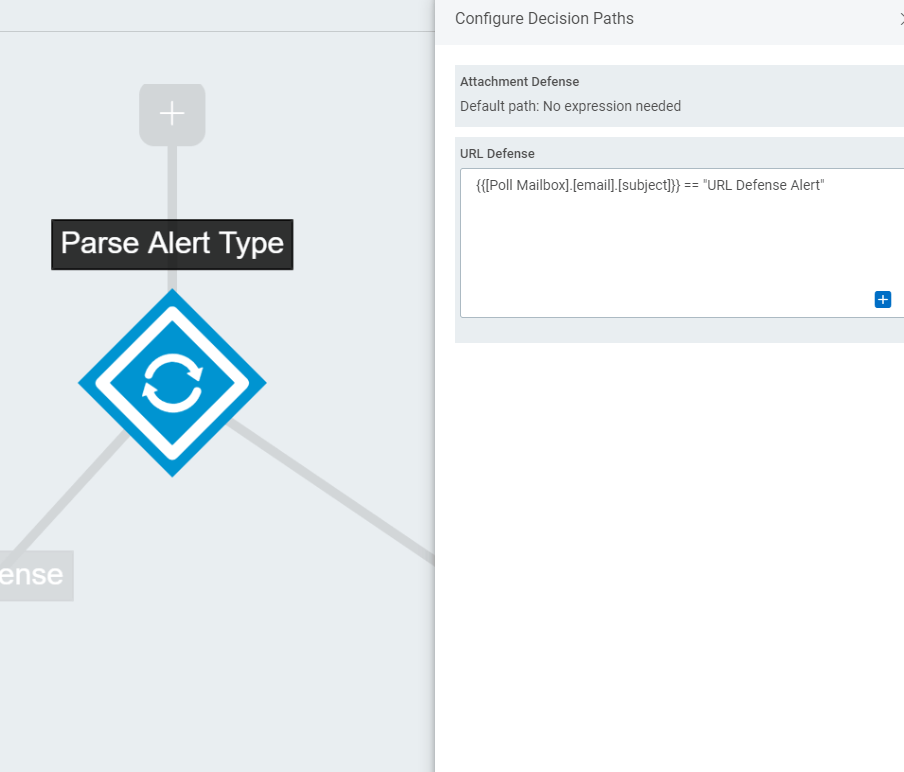
So now we have split our workflow into two chains, and these will both act independently of one another.
At this point, we determined that our workflow has enough information from the Attachment Defense alerts to continue down its chain, but that the URL Defense alerts will need some help via Proofpoint TAP’s API.
For brevity in this article, I will only go down the Attachment Defense alert chain. But to sum things up, the URL Defense Alert chain required us to make an API call to the Proofpoint TAP API to pull down the collection of recent click events instead of relying on the email alert content.
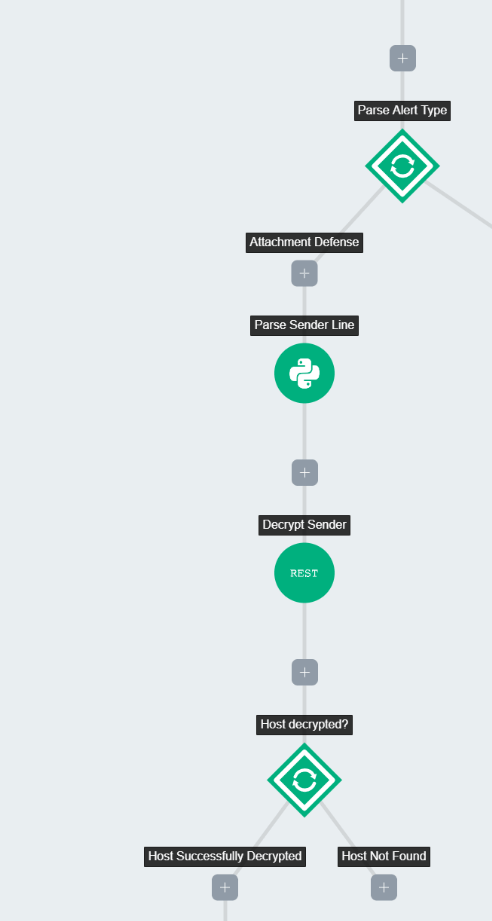
As we continue down the Attachment Defense automation chain, we run into another challenge. Proofpoint TAP email alerts for some reason hash the “sending host” portion of the sender within the alert using MD5. This was a challenge since we planned to build our content search and purge using this sender as a parameter. To remedy this, we used a little Python, and an MD5 decryption API to decrypt and put back together the sending host before moving forward. In the event that the sending host can’t be decrypted, the automation chain will attempt to use the Header From field. An automated decision is in place to see if the sending host was decrypted properly.
Now that we have the information we need in the chain to run a search and purge (email subject and sender), we can continue with this process.
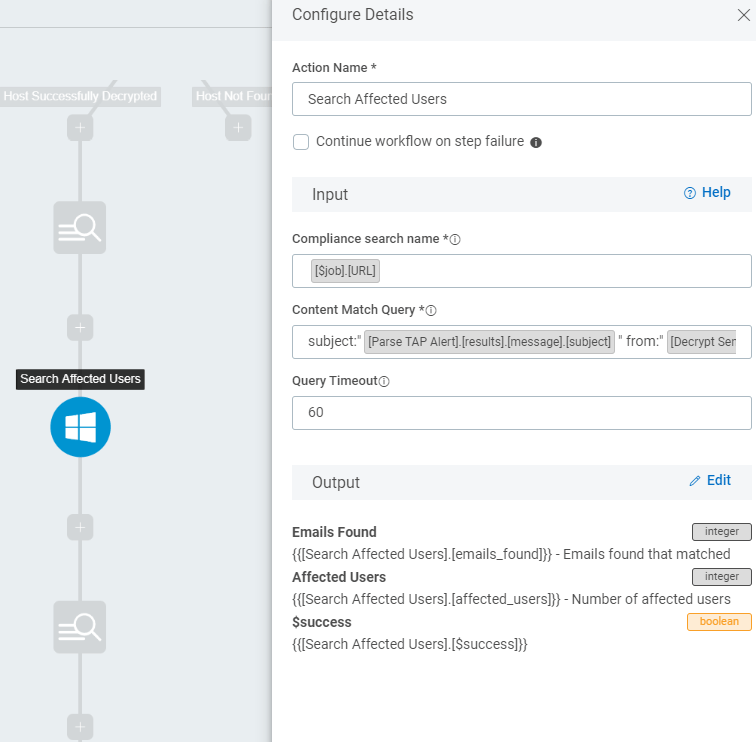
We next used the Rapid7 provided plugin for Microsoft O365 Email Security to build a Search and Purge job. This plugin utilizes Powershell on the back end to connect to the tenant and perform a Search, Purge, or Search and Purge. We decided to build the Search and Purge separately so we could output the Search data further down the chain. As you can see below, it creates a O365 compliance job that includes an identifier and builds the Content Match Query dynamically from our input. We just have to insert the tags of parsed data from the previous outputs within the chain. In this case the data is the subject of the malicious email, and the sender (that we decrypted).
Setting up the purge job is even more simple, since it uses the same Content Query that was already built from the search as input. It outputs a Boolean value of whether the purge was successful or not.

We aren’t quite done yet. Some things to consider here are that we aren’t sure whether this user actually executed this attachment. If they did, this could be a problem. How do we go about researching this, and what preventative actions can we take other than purging all of the email from mailboxes?
We decided to add a couple more things that we normally do manually when researching these incidents, and those are submitting the hash to VirusTotal and also Hybrid Analysis sandbox. Since we have the SHA-256 hash provided to us within the TAP alert for the attachment, we can then use that as input for plugins that connect to the VirusTotal and Hybrid Analysis APIs.

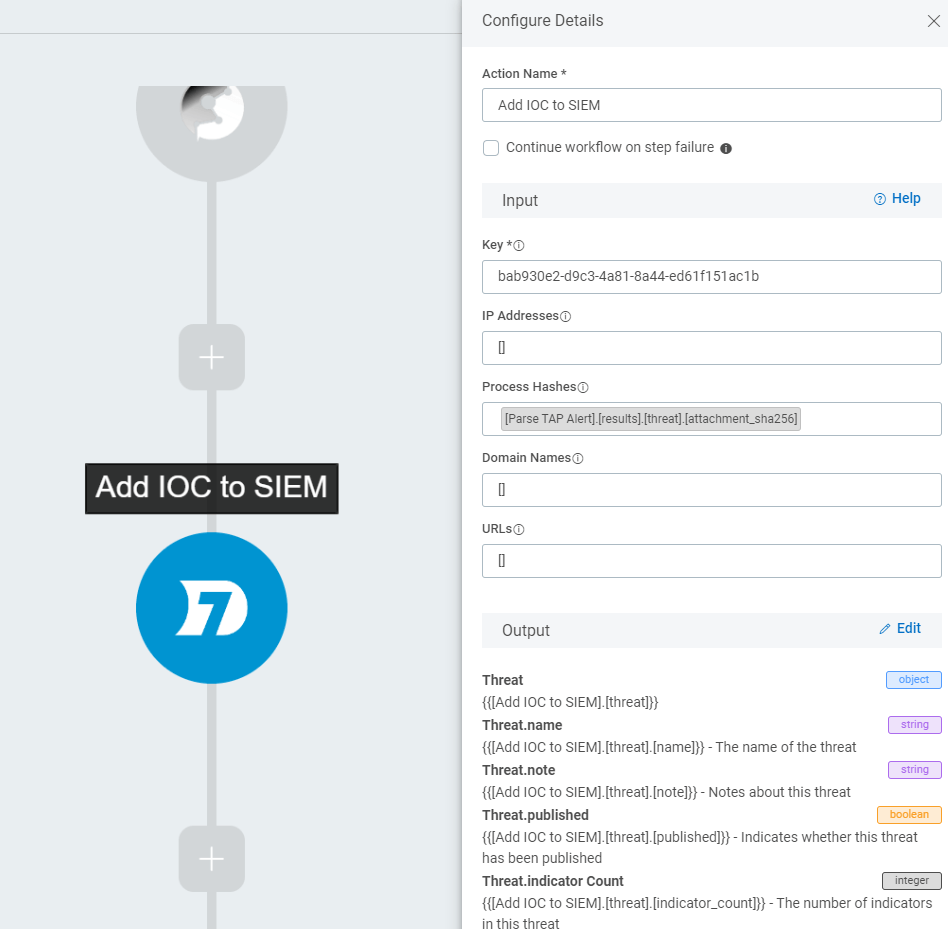
Not only do we want to have this automation workflow retrieve this helpful information for us to save time, but we also want to add this IOC into our environment automatically. If your endpoint security product has threat intelligence integration or the ability to add threat data via API, then you can automate this.
In our case, since we use Rapid7’s InsightIDR, there is native integration via a plugin that allows us to add an IOC to the SIEM to look for it across our entire environment. We can take this same hash, and add it to a threat identifier “automagically”.
This would also be a great time to block this hash or sender at your firewall, IPS, or email security gateway, and blacklist any malicious URL’s in your web proxy (all automated). You could even automatically document the incident by opening a ticket or record within a database or application that tracks your security incidents.
Finally, we want to notify the team of what took place. We send out an email alert using the Microsoft O365 Email plugin to let everyone know that an automation sequence ran, and include some of the helpful data we generated throughout the automation chain. We can include the Hybrid Analysis report, screenshots of the execution, and links to the VirusTotal page all within the notification email.

Conclusion
This article really only scratches the surface of what is possible with SOAR. It is an area where creativity plays a prominent role as much as technical skill. It can take some time to get things going the way you intend, but once it’s done you can rest a little easier knowing that some of these processes are working behind the scenes for you. I highly recommend that whichever way you decide to go with automation, that you partner with a vendor who will support your implementation success and who wants to see their customers succeed. I am still learning new things every day and finding new and interesting possibilities along the way. I expect as time goes on, SOAR will be an essential part of efficient information security programs.